How to update a name server at GoDaddy.com
Tutorial Hosting
Updating Your Name Servers at GoDaddy.com
If you have a domain name registered through GoDaddy.com and need to update your name servers, this step-by-step tutorial will guide you through the process. Starting from the GoDaddy.com homepage, you will learn how to access and modify your domain name server settings.
1. Login to Your GoDaddy.com Account
First, you need to log into your GoDaddy account. Go to the GoDaddy.com homepage and click on the “Sign In” button. Enter your username and password to access your account dashboard.
2. Access Your Domain Settings
Once you are logged into your GoDaddy account, navigate to the “Domains” section. Click on the “Domains” tab in the top menu bar and then click on the “Manage” button next to the domain name you wish to update the name servers for.
3. View Current Name Server Settings
In the domain management dashboard, you will see the current name server settings for the selected domain. This is where you can view and modify the name servers associated with your domain. Take note of the existing settings before making any changes.
4. Modify Name Server Settings
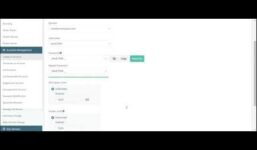
To update the name servers for your domain, click on the “Manage” link next to the name server settings. A new window will open, allowing you to make changes to the name server configuration. Select the “Custom” option to specify custom name servers for your domain.
5. Enter Custom Name Servers
In the custom name server settings section, enter the new name servers that you want to use for your domain. Make sure to input the correct name server information provided by your web hosting provider or DNS service.
6. Save Your Changes
Once you have entered the new name server information, click on the “OK” button to save your changes. Then, click on the “Save” button to apply the updated name server settings to your domain.
7. Verify New Name Server Settings
After submitting the changes, you will see your new name servers listed in the domain management dashboard. It may take some time for the changes to propagate and be recognized across the Internet. Typically, it can take up to 24 hours for the new name servers to fully update.
8. Completion of Tutorial
Congratulations! You have successfully updated the name server settings for your domain at GoDaddy.com. You now have the knowledge and skills to manage your domain name server settings efficiently whenever needed.
In conclusion, updating your name servers at GoDaddy.com is a straightforward process that involves accessing your account, modifying the name server settings, and saving your changes. By following these steps, you can ensure that your domain points to the correct name servers for optimal performance and reliability. If you encounter any difficulties or have further questions, don’t hesitate to reach out to GoDaddy’s customer support for assistance.